 |
Happy Voyager:
Jammed Main Shaft caused by Presser Foot Boss Jam
On occasions when the main shaft rotation is blocked at some point, a common cause is a jammed presser foot boss.
On this page is an explanation of how to troubleshoot for this issue and remedy.
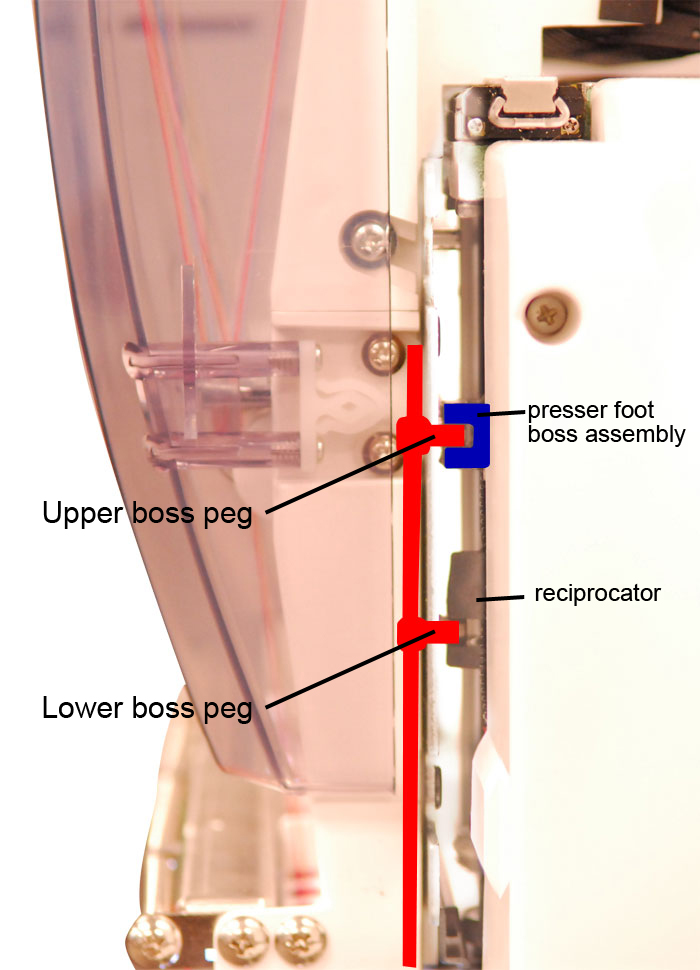
Normal Operation
(shown, left)
View your machine from the control panel side as
shown. The
colored parts show the normal connection of the needle bar (shown in red) and how it is locked to the presser foot shaft by
the upper (presser foot) boss assembly (shown in blue).
Each needle bar has an upper and lower peg as shown. The upper boss peg should
always be nestled inside the block assembly (blue) at all times.
NOTE: In the photo, the lower peg is shown locked into the reciprocator.
This is always the case when sewing, but does not have to be when not.
Engaged or disengaged is ok.
Explanation of Boss Jam
In the case of a "boss jam", you'll find the
upper peg is no longer
connected to the presser foot boss assembly (blue) - the boss assembly may be
floating above or below the upper peg of the nearest needle bar. If you
are unable to turn the main shaft through its full 360 degrees of rotation, a
boss jam like this is the usual cause, resulting in E-52 or E-18 Main Shaft
error messages.
Repairing Boss Jams
Repair techniques vary, and can be a little tricky to learn, but usually goes
quickly once understood and requires only a 1.5mm and 3mm hex wrench at worst.
Simple repair:
Ensure the timing wheel is at 275 degrees (in some cases, this
might require an assistant to hold the wheel in this position with a 3mm hex
wrench if it won't stay there.) Then, try pulling the nearest needle bar
down to the level of the presser foot boss assembly and turning the silver
needle change knob to slide that needle bar over to lock its upper boss onto the
boss assembly.
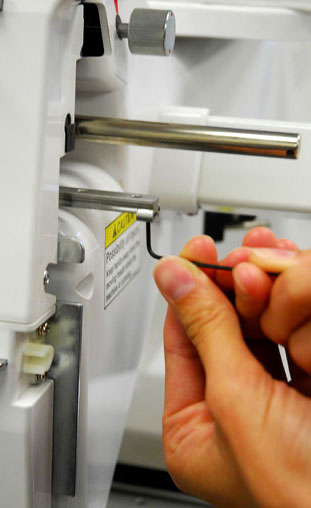
Slightly less simple repair:
This may require moving the head past needle 1 (to approximately the
needle "0" position, which will require removing the retaining clip as shown in
the lower photo, using a 1.5mm hex wrench. Once the clip is removed, use
the silver knob (shown at top of photo) to turn the head just past needle 1
(towards "0", not 2), just enough to free the head to push it further left.
Once free, you can more easily see the presser foot boss assembly and move it by
hand or with a tool so that it can then slide back onto the nearest upper boss
peg as you turn the color change knob.
Note: that as you push left, the black C-shaped take-up lever
forks for the left-most needles (see the head behind needles 12, 11) will slide
off the end of the round retaining bar. When re-engaging the head back
after the realignment is completed, be sure to re-align these take-up lever
forks back to the round bar so they don't block the head movement.
Disclaimer: following the above procedure to
free the head from the knob/color change cam incurs the risk of "over-turning"
the attached potentiometer too near to its full-stop position, risking breakage.
If you have any doubts following this procedure, contact your authorized service
center. This procedure should normally be undertaken by a trained
Happy embroidery machine technician.
|